Monday, July 27, 2009

How to install Virtual Server 2005 in Windows Vista Home Premium

Disclaimer: This is an unsupported way of running Virtual Server 2005, you should try it on your own responsibility.

Being a SharePoint developer I just wanted to prepare a test web farm for SharePoint using Virtual Server 2005, unfortunately the installer said that I cannot install Virtual Server on Windows Vista Home Premium and it requires more sophisticated Windows Vista editions

It requires Windows authentication in IIS to install its web based management console application, this is what home premium edition is lacking

After a lot of a search and failures, found a solution in an MSDN forum and this solution is NOT supported by Microsoft because we are going to do some unsupported workarounds

  • Turn off UAC and reboot the Vista machine
  • Double click the "Setup.Exe" of Virtual server 2005 and click install.You will be presented that you are running an unsupported operating system. Let the message box be open for some time
  • Dive in to you Temp folder,in my case it is /Aravind/AppData/Local/Temp/. You might need to enable "Show Hidden Files and Folder" from folder options

  • Copy this ”Virtual server 2005 install.msi” file from there to a safe location.
  • Download Orca MSI editor from this location and install it in your vista. Want to know more about what Orca, go to this KB Article
  • Open "Virtual server 2005 install.msi" in Orca
  • Go to Tools - > options - > find the “Database” tab and put a check mark in “Copy embedded streams during Save as”. Click ok to save the changes

  • There you find two panes, scroll the left pane to find “InstallExecuteSequence” and find “CaCheckOS” in right pane. Right click the entry and say “drop row”.

  • Find “InstallUISequence” from the left pane and find “CaCheckOS” in right pane. Right click the entry and say “drop row”.


  • Save all the changes, close Orca and now initiate the installation from this modified MSI file.
  • Choose a custom setup and disable the “Virtual server web application” option in that screen. Because this option will enable the installation of Web management console which depends on Windows authentication.


  • Here you go, complete the installation and say finish. Now we got the virtual server and related services in place without a web management console


  • Now we dont have a management console to create new VM or manage a VM, here comes Microsoft for our rescue
  • Microsoft provides a tool called VMRC plus which has a full management console, at least it provides 98% of all functionalities (it is mentioned in its help file) and it doesn’t require IIS or even internet explorer.

Here you go with your Virtual server 2005 running on top an Unsupported operating system

Related Links

Monday, July 20, 2009

FIX - Firefox 3.5.0 load time delay fixed

Firefox 3.5.0 didn't perform as it promised earlier, especially on loading the browser first time when you click from the start menu or from the quick launch bar. It took approximately around a minute to load the application. Practically no user will wait for this much long time and I ignored using Firefox for day-to-day use.

Finally Mozilla came up with a fix in Firefox 3.5.1 check out the release notes. So moral of the story is upgrade your Firefox to 3.5.1 and get the blazing speed.

Friday, July 17, 2009

Deploying a Cloud solution step-by-step

Prerequisite:
  1. You should have an compiled Azure Cloud service solution and its service configuration file handy
  2. You should have invitation code to redeem Azure services to unleash Storage and hosting services
Once you have above prerequisites in place, log in to Azure portal using your Live Id and click on your hosting project and follow the steps depicted in screen snaps

Click on deploy to start the deployment


Browse and provide the local path for your cloud service package and its config


Click on "Run" to start the services in staging mode, Be patient here until you see a green symbol under WebRole. Once you get the solution running you can use the URL which is having the guid as the hosted application's URL

Browse to that URL check the features what you have done in that page. Once you are satisfied promote the application to production. There you get the proper name which you specified to your application instead of the guid

Configuring Azure development storage to existing SQL server instance

When we install Windows Azure SDK, Azure development storage and Development fabric by default mapped to a localhost\SQLExpress instance. I don't have an SQL 2005/2008 express editions in my box. So the following changes were required to leverage the existing SQL server instance


For DevelopmentStorage.Exe
  1. Open C:\Program Files\Windows Azure SDK\v1.0\bin in explorer window and open DevelopmentStorage.exe.config file in text editor

  2. Find the connection string named "DevelopmentStorageDbConnectionString" in connection string block, replace the server name from SQLExpress to the instance running in your machine

  3. Find the hierarchy developmentStorageConfig->services->service name="Table-> replace the dbserver value from localhost\SQLExpress to the instance running in your dev machine

For DevtableGen.exe

Open DevtableGen.exe.config file in a text editor, replace the value of key "DefaultSQLInstance" from SQLExpress to your existing instance name. Save and close the editor. This file is used by DevtableGen.exe which Creates tables for use with the development storage table service

Now open your develpment storage UI, it should open with out showing any errors

Thursday, July 9, 2009

Gmail is no more a BETA product

Google apps are out of beta tags. Gmail, Google calendar, Docs and Gtalk are out of beta versions. After more than five years Google removed the beta sticker from Gmail


The Official Google Blog now proclaims: Google Apps is out of beta (yes, really) . And Matthew Glotzbach, director of product management for Google Enterprise more or less spells out that the decision has been taken for marketing reasons.

Google is keen to sell Google Apps to business users.

Are you using Google products ? Awake

Retrieve list of assemblies from GAC

Did you ever want to retrieve a list of assemblies along with their version in Global assembly cache? This will be helpful whenever we make system wide patching or updating to understand what changes happened in GAC or in case if you are troubleshooting on some other client machine if you want the version info of set of assemblies in that remote box quickly

Then this utility is a must in your toolbox(DumpUtil.exe). This console line application gives us a dump like the following

Sample output text from DumpUtil.exe
...
System.dll (1.1.4322.2407)
System.Configuration.Install.dll (1.1.4322.573)
System.Data.dll (1.1.4322.2365)
System.Data.OracleClient.dll (1.1.4322.2312)
System.Design.dll (1.1.4322.2300)
System.DirectoryServices.dll (1.1.4322.2300)
System.Drawing.dll (1.1.4322.2327)
System.Drawing.Design.dll (1.1.4322.573)
System.EnterpriseServices.dll (1.1.4322.2326)
System.EnterpriseServices.Thunk.dll (1.1.4322.2326)
...

Related link: http://aravindrises.blogspot.com/2008/08/want-to-take-dll-backup-from-gac.html

Monday, July 6, 2009

Setting up an FTP server step-by-step

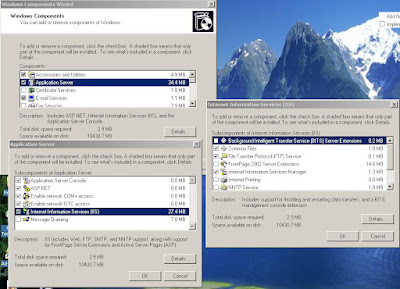
In windows 2003 FTP service is not installed by default
  1. Click Start, point to Control Panel, and then click Add or Remove Programs.
  2. Click Add/Remove Windows Components.
  3. In the Components list, click Application Server, click Internet Information Services (IIS) (but do not select or clear the check box), and then click Details.
  4. Click to select the following check boxes (if they are not already selected):
    Common Files
    File Transfer Protocol (FTP) Service
    Internet Information Services Manager

configure FTP Server for anonymous access

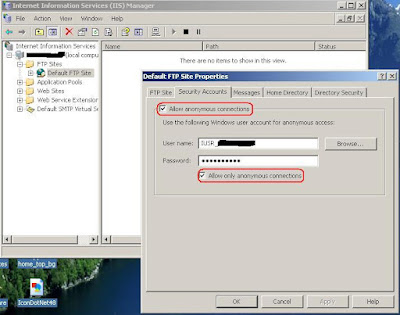
  1. Start Internet Information Services Manager or open the IIS snap-in.
  2. Expand Server_name, where Server_name is the name of the server.
  3. Expand FTP Sites
  4. Right-click Default FTP Site, and then click Properties.
  5. Click the Security Accounts tab.
  6. Click to select the Allow Anonymous Connections check box (if it is not already selected), and then click to select the Allow only anonymous connections check box.


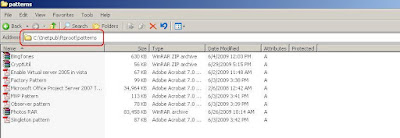
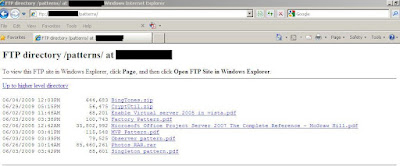
The FTP server is now configured to accept incoming FTP requests. Copy or move the files that you want to make available to the FTP publishing folder for access. The default folder is drive:\Inetpub\Ftproot, where drive is the drive on which IIS is installed.


Now share your FTP address to the users across internet, they can access files.